My Account
Superior know how
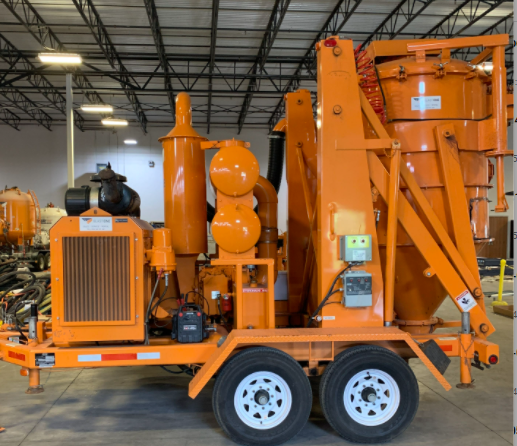
VecLoader 721 Walk-Through and Troubleshooting
And today we’re going to be reviewing the daily maintenance tasks and the general operation up to seven twenty-one vecloader.
Before any operation on the Vecloader, I do a full and thorough walk around, and this includes from the tongue all the way to the out of the aft of the machine.
And the big thing is I look for any loose nuts, bolts, hydraulic lines that are loose and leaking.
And then I also check the drive belts from the PTO, from the from the engine to the engine belts and everything else.
So what I’m going to start looking for here, up front are any loose hydraulic lines on these Jack stands for these jacks.
These are hydraulic driven jacks that is that has an auxiliary pump mounted to the motor.
So what I do is, as I do a quick check to see if any of these are loose and if any of the hydraulic lines are frayed or cracked, or glazed.
I also check for any loose hardware on these jacks because these jacks are going to bear the weight of the 721.
When you go to set up the back house, the next thing I do is I continue my walk around, make sure there’s no significant oil leaks or hydraulic leaks on the bottom.
So a quick way to do that is just to see if you have like a puddle building up.
Luckily, we don’t have any puddles here more hydraulic lines coming off here and to work our way back, we want to make sure none of our gauges are cracked.
We have the pressure gauge for the butterfly valve, the vacuum gauge, and the magnehelic gauge. There’s a magnehelic gauge right here. And also on the aft around the bag.
Next thing we want to do is want to make sure all of our couplings and hoses are very tight.
The last thing we want is a loose hose and vacuuming. And somebody somebody will walk into the vacuum on the way back on and make sure all of our tires, we have the right amount of pressure.
So you can do a visual inspection or you can take a pressure test against the tires and make sure there’s adequate gas in the tires.
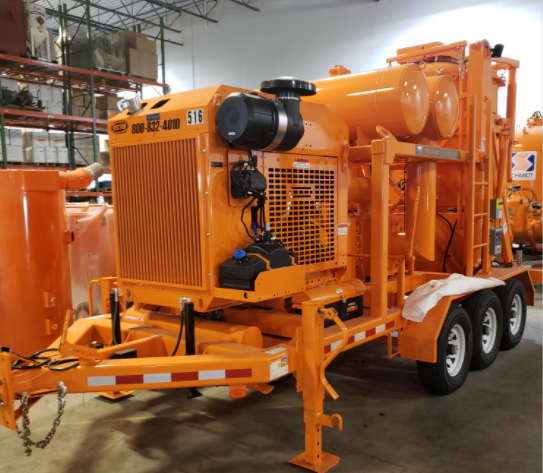
Next thing we want to do is continue our way back to the aft, the back houses, very pertinent to the operation, this machine.
So before the operation could start the machine, we want to make sure we remove this inlet elbow and do a visual inspection of the inside of the unit.
If there is significant wear you don’t want to use the unit because you can create wear within this area and also in the square plate, Located on the unit, there are two drain daily ball valves.
These ball valves are set about 90 PSI for the butterfly ballot. The purpose of these ball valves is to drain any moisture within the system. So it’s very pertinent.
At the end of the day that you keep your crack these ball valves to get any moisture from your air system.
Next thing we want to do is this gravity dump will make sure the gravity dump bore has a gasket. Otherwise, we’re going to have issues with your vacuum suction and it’s not going to perform at an optimal performance walking around.
We want to make sure each one of these jack leaks has the pins, and then because when the back house rises, we’re going to be utilizing these pens to stance the entire unit on for these jack leaks.
Another very important component of this machine is the emergency stop. So you have your e-stop switch in the pennant that’s going to run. You always want to run the length of your of your vac hose if you’re going to be operating it
yourself down the line or have somebody next to you with the e stop down the line as well.
Any time you have another section of hose you want to hit the e-stop and turn the vacuum off and walk back, add your hose and then add another 50 feet or so or however long the run as the electric line to make sure you the e-stop stays with you.
This unit over here is the lower bar. This is what’s going to create your vacuum.
And on your inspection, you’re doing an inspection checklist.
You want to make sure that the site glass is at least halfway full of oil.
If it’s too low, then you’ll have to add the recommended oil at the recommended spec. For how much oil is.
Next, we have our clutch shaft PTO that is mounted to the engine with these.
We want to make sure these grease points on these are grease quickly. There are 17 grease points on a two axle unit and 23 grease points on the three axle units. So you’re going to see them on the the PTO, the clutch shaft
and also on the Jacks and Jack’s hands.
Next thing we want to do is make sure we have adequate oil level.
The 721s have John Deere engines in them. So the oil gauge or oil dipstick is located on the left side of the motor. And all you got to do is turn it, puts it out and check the oil.
Next we’re going to review the batteries, make sure all the terminals in the batteries are secured. We don’t want loose terminals. And then the last few things that we’re going to take a look at is our depth level and also air filters,
our engine air filters. So there are two sets of filters in here. You’re going to have your primary and secondary filter. You’re typically never going to change the secondary filter unless your primary filter has a hole and has some kind of low by or it’s not installed correctly, and that gets dirty.
You typically want to take out the air filter, check it out and blow it off if it’s too dirty or install a new one.
As far as your checklists go on your general checklist, that’s pretty much all you need to do.
Just quick visuals and make sure you touch everything.
And that’s pretty much it as far as the general inspection and inspections go.

START-UP & STOP